Showing posts with label ideas. Show all posts
Wednesday, May 9, 2012
Cutest Soccer Snacks
Cucumbers and cheese biscuits aren't usually the most exciting snack, but packed up this cute they sure are! I used cellophane bags, blank business cards and stamps to package the biscuits and press-n-seal wrap to pack up the cucumbers. Our U6 team definitely seemed to enjoy.
Labels:
biscuits,
children,
cucumber,
fun,
healthy,
healthy kids snack,
ideas,
individual,
kids,
kids snacks,
package,
packaging,
packaging ideas,
party,
picnic,
presentation,
small,
snack,
sports
Thursday, February 9, 2012
Using Small Spaces- Kids Corner on the Stairs
My house is pretty little, and I'm starting to learn how to make the most of my nooks and crannies! Here's a little spot on the stairs that I created in less than 30 minutes with chalkboard stickers and vintage flash cards.
To string up my vintage Sesame Street flashcards I just tied string onto cute push pins and stuck them in the wall. If they're too loose, they droop a lot, so pull the string tight! I used a flat white tack in the corner so it was less noticeable (although I took the photos before I changed them out). I found some sweet mini clothespins to attach the cards with, although binder clips or even paper clips would work too.
I'm still looking for some way to store the chalk on the wall, so for now, we're using a mason jar to hold the chalk and the brush.
More redesigned nooks and crannies to follow soon!
Labels:
apartment,
chalk,
children,
condo,
corner,
decor,
decorating,
home,
how to,
ideas,
kids,
small spaces,
space,
stair well,
stairs,
sticker,
use,
vintage flash cards,
vinyl,
what to
Tuesday, December 20, 2011
A Vintage Treat for the Kitchen
I found this adorable vintage owl planter (so weird that people used to like tiny plants so much...) online at Out'A Space, a great Florida based vintage shop. It's so perfect to hold my scrub brushes, so happy that my kitchen is finally coming to completion. More photos soon!
Monday, November 28, 2011
Vintage and Salvaged Frames into Chalkboards: Tutorial
I ended up with an extra table to fill in a week at my last craft sale (don't ask...) and I wanted to make grown up things for a change. I went scouting at a few thrift stores and found some awesome frames. The plan was to spray paint the frames in nice lively colors and spray paint the glass in chalkboard paint, but as you know, something always goes wrong when I'm crafting something new!
What you need:
Frames
Chalkboard paint (spray or paint on)
Spray paint
Drop Cloth
It turns out that vintage frames are often made a lot differently than modern ones, which mean ripping out nails and hammering them back in and accidentally breaking glass that was seemingly permantently affixed. On one frame, it seemed that the glass was actually trapped in the wood somehow. On that one, I taped off the frame and painted, rather than spraying.
On the ones without glass, or where I broke the glass (wah!) I tried many things. First I called Michael's to ask about custom cut glass, but it was super expensive. Then I went to Home Depot to look for small cuts of sheet metal (magnetic!) or plywood, but no one could help me troubleshoot. I eventually came home and used some fiberboard/poster board from my office supply stash and it worked like a charm.
There was lots of troubleshooting, but the results were great, and people loved the big ones! I think I'll try it again, now that I know what I'm doing!
Thursday, November 24, 2011
Baby Gift: Twin I-Spy Mini Quilts
Look what I made for some darling twin boys! Mini I-Spy quilts, perfect wiping drool right now and for tummy time, strollers and car seats later. It could even be used as a tic-tac-toe mat when they're older!
And a couple of little wooden teething rings to match! Not how I usually make them, but they sure are cute!
Labels:
baby,
boy,
carseat,
doll quilt,
Eye Spy,
fabric scraps,
gift,
handmade,
homeade,
I Spy,
ideas,
mini,
Quilt,
stroller,
toy,
tummy time quilt,
twins
Wednesday, October 19, 2011
Handmade Stocking Stuffer SWAP CHALLENGE!
I love swaps, I love handmade stocking stuffers and I love a good competition! Here it is, all in one shot; I'm hosting a swap on Swap-Bot and it's going to be awesome.
SWAP: A perfect Holiday swap! Send your partner 6 HANDMADE (by you or someone else) items for their stocking. Only send things that your partner likes (check their profile) or that you would be happy to receive. Ideas below.
WIN THE CHALLENGE: This isn't just a swap, it's a challenge! Post what you're mailing to your partner on your blog or Flikr account. I'll chose the best package and send the winner a little gift!
OPEN TO:
Residents of US & Canada,
Swap-Bot users with a rating of 4.5 and higher,
Newbies with a current blog and well filled out profile only.
IDEAS: Magnets, Coasters, Slippers, Mittens, Scarf, Hat, Jewelry, Candy, Cufflinks, Socks, Bath/Body products, Pincushion, Stationary, Notebooks, Reusable bags and the list goes on. Check out Martha Stewart, Pintrest, Tip Junkie and other crafty sites for fun, unique ideas. MUST BE HANDMADE.
You can sign up on the Swap-Bot website. Spread the word!
SWAP: A perfect Holiday swap! Send your partner 6 HANDMADE (by you or someone else) items for their stocking. Only send things that your partner likes (check their profile) or that you would be happy to receive. Ideas below.
WIN THE CHALLENGE: This isn't just a swap, it's a challenge! Post what you're mailing to your partner on your blog or Flikr account. I'll chose the best package and send the winner a little gift!
OPEN TO:
Residents of US & Canada,
Swap-Bot users with a rating of 4.5 and higher,
Newbies with a current blog and well filled out profile only.
IDEAS: Magnets, Coasters, Slippers, Mittens, Scarf, Hat, Jewelry, Candy, Cufflinks, Socks, Bath/Body products, Pincushion, Stationary, Notebooks, Reusable bags and the list goes on. Check out Martha Stewart, Pintrest, Tip Junkie and other crafty sites for fun, unique ideas. MUST BE HANDMADE.
You can sign up on the Swap-Bot website. Spread the word!
Labels:
2011 swap,
christams ideas,
christmas,
christmas swap,
contest,
craft,
craft swap,
current swap,
exchange,
handmade stocking stuffer,
ideas,
north america,
prizes,
stocking stuffer,
swap
Monday, October 17, 2011
Quiet Book #2- Around The House
Bring something cool and handmade to a baby shower, and you can bet you'll be making it again! Here's my second attempt at a simplified quiet book. I just couldn't find another 9 hours in my schedule to make a second 8-page book! I made it in an 'Around the House' theme, since children love to mimic adults more than anything.
Since it was a smaller book, I added a memory matching game (the bag is sewn in) on the inside cover. I think it fits with the theme of household activities, and little one can pretend to wash them, or add clothespins for some extra fun. The flowers button off for practice buttoning, just like the button snake. It's a great time-killer!
A simplified version of the oven and cookies, and a new addition. I adore this little garden, with it's package of seeds and watering can! I used fabric markers all through this book to speed the process up. It's so much faster than embroidering, and more fun too.
I love this idea for practice with brushing or braiding. It's a bit girly, and I usually try to make them unisex so they can be passed down, but I couldn't resist! The back cover has a pocket to add pieces for any of the activities, or paper and pencil.
Sending it for a test run to make sure it's as cool to a kid as it is to me!
Labels:
activity,
activity book,
baby book,
baby gift,
boy,
children,
girl,
handmade,
handmade quiet book,
homemade,
how to,
ideas,
project,
quiet,
quiet book,
soft book,
toddler
Friday, September 16, 2011
New Fundraising Program!
I am so excited to announce my new fundraising program for schools and non-profits! I love to support my community, and I hope that this gives a fun and useful new option for families and organizations. You can support local and handmade, buy a unique gift and at the same time earn money for your program!
Here's a sample brochure for your browsing pleasure!
Wednesday, September 7, 2011
DIY Craft Room/Office Makeover Revealed!
Finally, I'm done. Well...mostly. I still need to reorganize my closet, but it's good enough for now!
I'm ever-so-pleased with how the red/turquoise/blue color scheme turned out. It's subtle since it's mostly in the accessories, but gives the space a little creative 'pop'.
I love the kid-friendly crafting space. With the junk pile we had going on before, I was always shooing Daniel out or stressed because of the mess, but now he is a crafting-machine! I love, love, love the small lack shelves at his height. Anything I want him to be able to reach himself goes there and he can just help himself.
The best part for me is definitely the shelves above my sewing table. They look nice, store a ton of fabric and other bits and pieces and keep things close by, but out of the way!
Storage is everywhere! I have so much storage now, some of it is even empty! I have plastic drawer units and hanging shelves in the closet, boxes and buckets, and shelving everywhere. How dreamy!
Pretty much everything is from Ikea which kept cost down and the look consistent, which I think makes a small space look bigger. Hooray for an efficient, pretty space to create in!
| My desk. Notice the pipe-cleaner decor by Daniel. |
I'm ever-so-pleased with how the red/turquoise/blue color scheme turned out. It's subtle since it's mostly in the accessories, but gives the space a little creative 'pop'.
I love the kid-friendly crafting space. With the junk pile we had going on before, I was always shooing Daniel out or stressed because of the mess, but now he is a crafting-machine! I love, love, love the small lack shelves at his height. Anything I want him to be able to reach himself goes there and he can just help himself.
The best part for me is definitely the shelves above my sewing table. They look nice, store a ton of fabric and other bits and pieces and keep things close by, but out of the way!
| My beloved Lack shelving holding my fabric stash! |
| A plastic tray holds all my sewing notions |
Storage is everywhere! I have so much storage now, some of it is even empty! I have plastic drawer units and hanging shelves in the closet, boxes and buckets, and shelving everywhere. How dreamy!
Pretty much everything is from Ikea which kept cost down and the look consistent, which I think makes a small space look bigger. Hooray for an efficient, pretty space to create in!
Wednesday, July 6, 2011
Delightful Summer Cupcakes
I was on cupcake duty for my dear friends wedding shower last month and I decided to try some fun flavors. Party guests were raving about these tiny little gems, and I thought they were just being polite. That is, until I tasted one. And another. And then I thought...I guess I should try all of them. Genius! Here's the gist of how I made them (sometimes I wish I used real recipes!!!)
Cake:
I split the vanilla batter in half and added 2-3 Tbsp of lemon flavoring. You can add food coloring or lemon zest so you can tell them apart from the plain vanilla. Taste the batter to make sure they're really lemony! Bake the lemon and vanilla in mini muffin tins.
Bake the chocolate cupcakes in mini muffin tins, adding 3 or 4 chocolate chips to the tops of half.
Icing:
Whip up the base icing (make it nice and thick) and divide into 4 bowls.
Classic Buttercream Icing (Base):
5 cups icing sugar
1 Cup soft butter
1 1/2 tsp vanilla
2-4 Tbsp Water or Milk
Classic Lemon Cupcakes:
Base Icing plus 3-4 tsp lemon flavoring on a vanilla cupcake. Garnish with lemon zest if desired.
Raspberry Lemonade Cupcakes:
Base icing plus 2-3 Tbsp raspberry jam or raspberry puree on a lemon cupcake. You may need to add more icing sugar if it thins out too much. Garnish with a fresh raspberry if desired.
Mocha Chip Frappuccino Cupcakes:
Base Icing plus two packages of Decaf Starbucks Via (you can substitute instant coffee, but it's really not the same!!!) on the chocolate cupcakes with the added chocolate chips. A chocolate chip or chocolate espresso bean are perfect garnishes.
Chocolate Coconut Cupcakes:
Base Icing plus 2-3 tsp of coconut flavoring on a plain chocolate cupcake. Garnish with shredded coconut before icing sets. This was the #1 hit of the night. DELISH!
Tips:
-This little tool is so amazing (and inexpensive) that I've thrown away my piping bag!
-Use mini tins. The icing to cake ratio is perfect for these combos.
-Taste everything as you go and add bits of flavoring as you taste to make sure it comes out right.
-Make sure the icing is quite thick so it holds it shape. If you add any liquid to the base, that means you'll likely have to add more icing sugar to get the right consistency.
Friday, April 8, 2011
Playsilk Fun!
Playsilks make dress-up games so entertaining! Daniel was very proud of his long blue hair.

We spent a whole afternoon making everyone into princesses (oh, son....) and dancing at the ball.
Silk Playground has lots of great ideas for putting your playsilks to work, including using one to line an Easter basket (what a great gift!) and for playing peek-a-boo.
Monday, November 22, 2010
Giveaway Winner and Craft Sale Recap!
The winner of the mini wooden matching game is:
Gianna!!
I don't have your info, so please contact me this week to claim your prize!
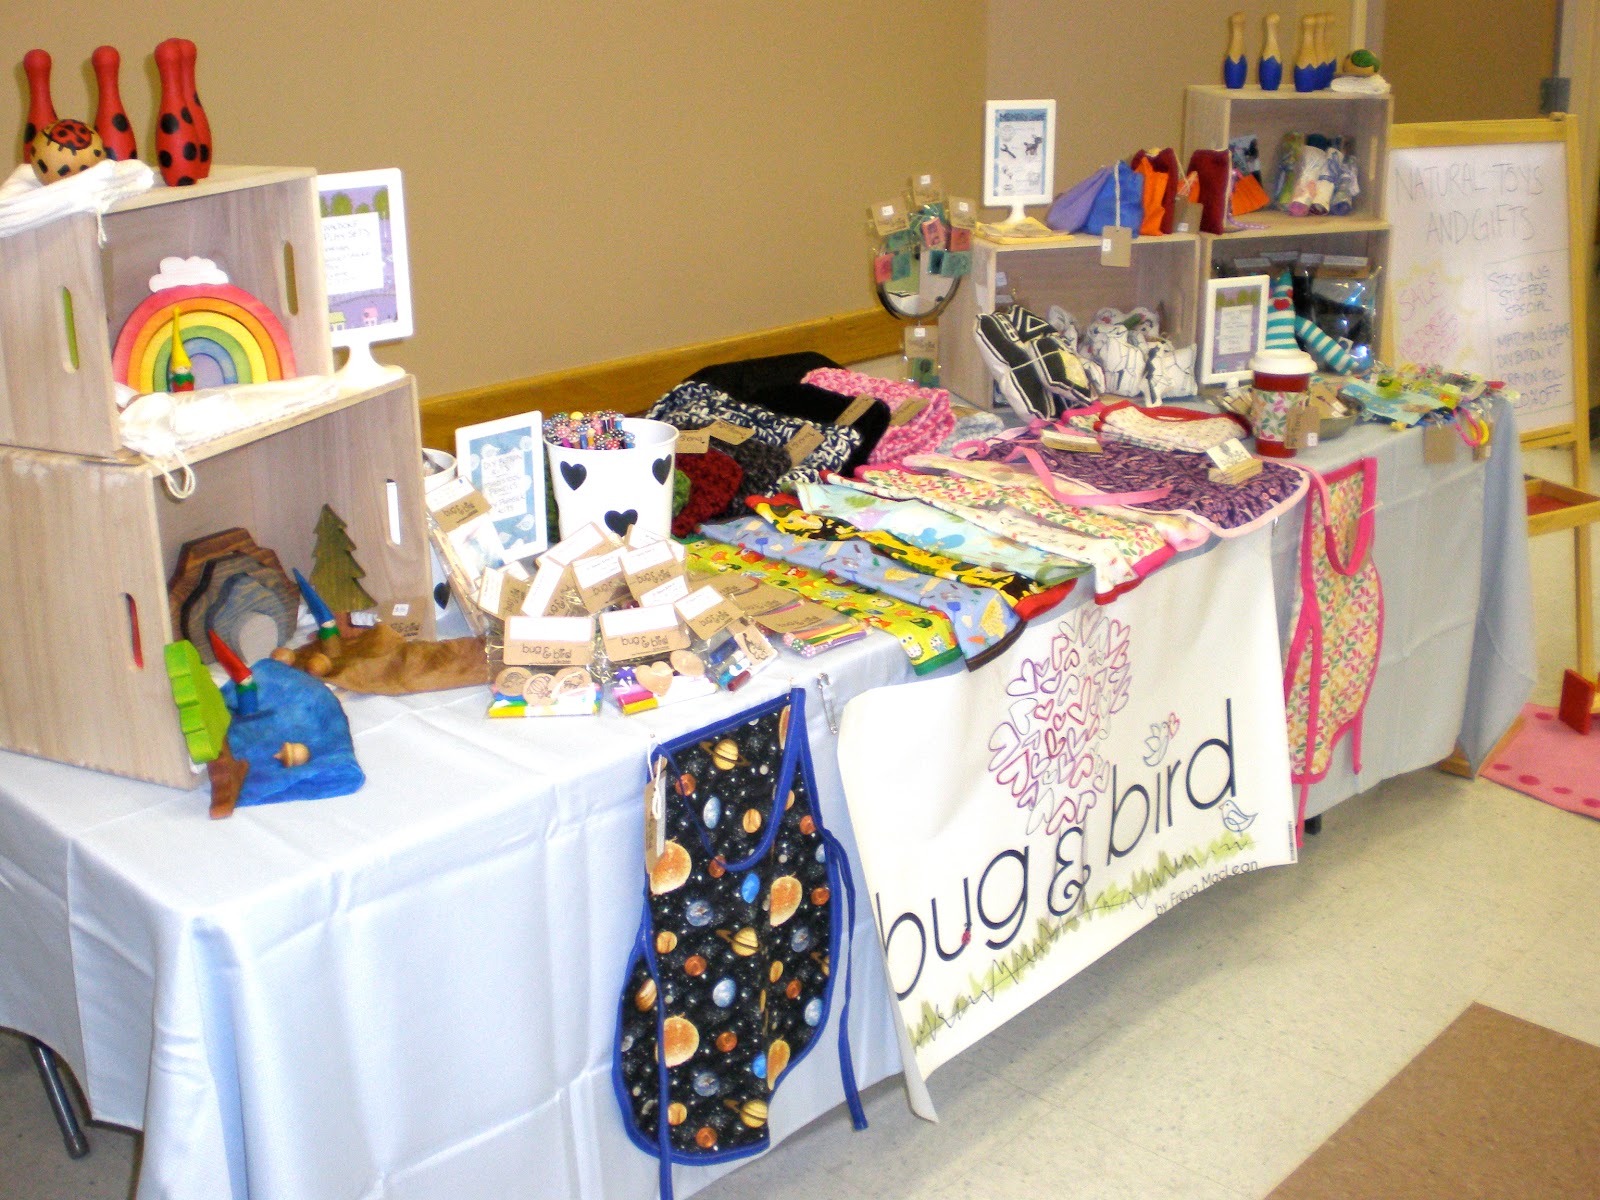
I feel like I'm finally back to normal life. This weekend was busy at the Edgemont Craft Sale and a last minute table at the AP Village Craft and Bake sale. Both were great successes! I had a ton of friends and some family stop by, and I was so overwhelmed with all the love. Awww...sappy moment :)
I learned a lot about what people like most and what sells fast. I also learned that I hate making some things in big quantities! I am considering a booth at Mommylicious, Naturally, and the Lilac Festival...big fees and big attendance! It's a tough leap to take!
A few tips on the table:
I got these awesome boxes at Jysk for $50 or so. They helped me to create levels which is so important with small items!
Tablecloths can be crazy expensive ($70 at Home Outfitters!!) but I found some great deals on nice ones at Homesense and Superstore.
My easel was only $20 at Ikea (well...Daniel's easel) and was great for posting my specials. I also found those great frames which I used as signs for .99 cents! Woot!
Since I sell kid's stuff, I had a couple of wooden toys on a small carpet. That way, kids were happy and mom could take her time looking!
Labels:
craft,
craft fair,
craft sale,
giveaway,
ideas,
merchandising,
selling,
set up,
small,
table,
tips,
vendor,
winner
Thursday, November 18, 2010
A Few Great Treasuries!
Gift Guide for My Hubby
For a Mail Carrier
Young Artist
First Dance
Share your favorite treasuries and gift guides...I'd love some more ideas!
And remember to enter my giveaway! It closes on Nov 20.
Labels:
etsy,
fornt page,
fp,
gift guide,
ideas,
inspiration,
treasury
Thursday, October 21, 2010
Homemade Stocking Stuffers Part 2: Preschoolers
A few weeks have passed since part one...I don't know where the time went! Busy, busy, busy with getting ready for my first craft sale!
So, at last, Part 2 of my Stocking Stuffer Series. Keep your eyes open for the school age list in the next week or so!
Preschoolers:
Baby Food Jar Matching Game: A friend shared this link with me, for how to make a matching game from jar lids! She even shares her images so all you have to do is print and paste!
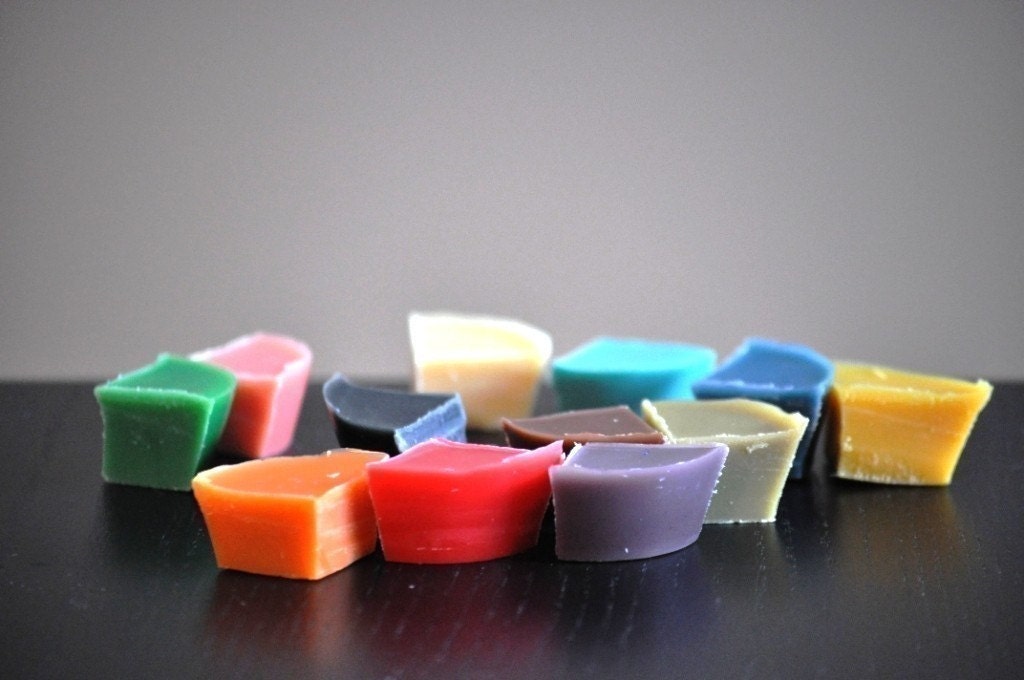
Homemade Modeling Beeswax: Recipe- 1 cup of beeswax, 2 tbsp olive oil, 2 tsp lanolin. Melt beeswax over low, remove from heat and stir in oil and lanolin. You can add grated crayon for color. Let it cool in a lined pan. If it's too soft, add a litle more beeswax, if it's too hard add a little lanolin. You can find all the ingredients at most health food stores
Mini Notebooks: It's basically as easy as picking one scrapbooking paper that you like for the cover, cutting it to size, cutting blank paper just a smidge smaller, fold in half, staple in the center and then stamp or embellish the cover!
Crayon Roll: This is a perfect mate to the mini-notebook! It's a great beginner sewing project and because it's small it's easily done by hand too. There are tutorials all over the place, but I like this one.
Funky Fleece Scarf: There's a great tutorial here for a fun, simple scarf. Preschoolers love funky accessories!
Bath Paint: A great way to get a reluctant bather into the tub! Mix 4 Tbsp cornstarch, 1/3 cup body wash and food coloring. Add extra cornstarch if it's not thick enough. Store in plastic containers with lids and top with a paintbrush!
Craft Kit: Put some googly eyes, popsicle sticks, feathers, pipecleaners, ribbon and yarn in a ziploc bag. This is a great thing for when the Christmas excitement wears off just before dinner and you need to distract them!
Lick-and-Stickers: Make your own lick and stick stickers! Cut out your images from magazines, coloring books, old art projects or scrapbook paper. Add a pkg of gelatin to 1/2 cup water. Stir to dissolve gelatin and paint onto the back of images. Let dry wet side up. When they're dry, they're ready to be licked and sticked!
Apron: Kids love helping in the kitchen and an apron makes preschoolers feel even more grown up! You can find all sorts of tutorials and patterns on line and in books. I use the kids patterns in The Perfect Apron.
Shape Crayons: I just bought a silicone ice cube tray from Ikea that I am going to use to make shaped crayons as gifts for Daniel's classmates. All you do is warm the oven, break up crayons into the mold, turn off the oven, wait until they melt and remove and cool. Simple and fun.
Next Week: School-Agers!
So, at last, Part 2 of my Stocking Stuffer Series. Keep your eyes open for the school age list in the next week or so!
Preschoolers:
Homemade Modeling Beeswax: Recipe- 1 cup of beeswax, 2 tbsp olive oil, 2 tsp lanolin. Melt beeswax over low, remove from heat and stir in oil and lanolin. You can add grated crayon for color. Let it cool in a lined pan. If it's too soft, add a litle more beeswax, if it's too hard add a little lanolin. You can find all the ingredients at most health food stores
Crayon Roll: This is a perfect mate to the mini-notebook! It's a great beginner sewing project and because it's small it's easily done by hand too. There are tutorials all over the place, but I like this one.
Craft Kit: Put some googly eyes, popsicle sticks, feathers, pipecleaners, ribbon and yarn in a ziploc bag. This is a great thing for when the Christmas excitement wears off just before dinner and you need to distract them!
Apron: Kids love helping in the kitchen and an apron makes preschoolers feel even more grown up! You can find all sorts of tutorials and patterns on line and in books. I use the kids patterns in The Perfect Apron.
Shape Crayons: I just bought a silicone ice cube tray from Ikea that I am going to use to make shaped crayons as gifts for Daniel's classmates. All you do is warm the oven, break up crayons into the mold, turn off the oven, wait until they melt and remove and cool. Simple and fun.
Next Week: School-Agers!
Thursday, October 7, 2010
Homemade Stocking Stuffers Part 1: Toddlers
Last year we had our first handmade Christmas. It was awesome! And a LOT of work. I am not making everything this year, but from now on, I will always make some or all of our gifts. Here are some of my favorites for toddlers. Be careful, some are a bit chokey for little ones.
Toddlers:
Magnets- you have to be careful because they can be a choking hazard, but I scanned, cropped and printed Franklin Characters onto magnet paper from Staples. Daniel is still playing with them! There are probably all kinds of tutorials for other types as well.
Painted Wooden People- I painted wooden people pegs to look like our family. They were a big hit but Daniel lost himself almost immediately.
Homemade Play Dough: Here is one site, with a million recipes. You can also pack it in a stainless steel conatiner like this and have a great, eco friendly way to pack snacks later.
Honey Toffee: I use Honey, butter and vanilla and boil to the hard crack stage (it doesn't come out hard because honey is pretty gummy) and wrap it in wax paper. It's one of those treats I don't mind giving Daniel because it has no sugar in it. For those of you who like recipes, there's one here.
Felt Cookies: There is a great tutorial at Prudent Baby, but really it's as simple as cutting felt into cookie shapes, sewing embellishments on the top side of the cookie (beware of small things that may come off) and hand stitch them together. Felt doesn't fray, so it's a great beginner sewing project to do by hand.
Crayon Roll: I made a mini one for Daniel's stocking. I recommend reading a few different tutorials and choosing what you like best, or making up your own! Who doesn't love new crayons???
Crocheted Headband: I made myself a headband from this pattern at Creative Yarn, and noticed that someone modified the pattern to fit her daughter. I made one for a friend and it's cute!
Neck Tube: Best thing EVER! No more scarves all wrapped around to go out and play. Cut a piece of polar fleece fabric about 5x20 (measure you child's neck and leave a little extra room to pull over head), fold it in half and sew it together, right sides together. Voila! We love ours.
CD from Daddy: Or mommy. Or whoever is not the crafty one! My hubby burned Daniel his own CD of favorite songs and it was a huge hit! In fact, he received another one for his birthday. This is a great way for older siblings to make gifts for each other or the non-crafters to get in on the handmade goodness.
Felted Balls: Ours were a bit awkward looking, because it was my first try. Luckily, wonky balls are still fun.
Foot Bath in a Bag: I put a bit of oatmeal, some lavender buds and a bit of loose leaf tea in a bag and Daniel enjoyed his very own relaxing footbath. Yes, he really did sit still! He still talks about it!
Add a candy cane and a Christmas orange (or is that just my family?) and you have a pretty well rounded, toddler stocking full of handmade goodies!
In the next few weeks, I will be posting ideas for Preschoolers, School agers and maybe even grown ups! I don't know if I'm brave enough to tackle a handmade teen stocking!
Subscribe to:
Posts (Atom)