Showing posts with label tutorial. Show all posts

Friday, July 26, 2013

Instant Embellished Onesies For Summer


Summer with a baby under 6 months is tricky because they're too little for sunscreen. After a bit of research, I decided on long sleeve white onsesies with UV babylegs and a sunhat to keep babe covered and cool. The only problem is that white onesies are bo-ring!

So, I did what any crafty mama would do and dove into my fabric stash! I cut darling little scraps out of my favorite fabrics and zig zag stiched them on. I didn't want them to look the same, all sewn in the center of the chest, so one has a tiny fox on the 'breast pocket' and another has a coordinating embellishment on the back as well.

So far, they've been awesome for keeping Asher cool and safe. Plus, it's a great scrap-stash buster.

I wish I was able to get better photos, but we are constantly using them!


Thursday, October 25, 2012

Easy Homemade Lip Balm Recipe


This lip balm is the best. I've tried all sorts of expensive natural chapstick and been disappointed every time. When I started using my homemade stuff, I was able to go from constant, all day application to once in the morning and once at bedtime!


Ingredients:
2 tsp coconut oil
1 tsp beeswax
1 vitamin E capsule
5-10 drops of sweet almond oil 
*optional 5-10 drops essential oil such as sweet orange, peppermint, vanilla or cinnamon

Melt it all in a pan (be clever and use one that pours well) on low heat. If using essential oils, add after removing from the heat. Pour into containers.


Tips:
 *I bought a big brick of beeswax from a honey supplier. I use a sharp, heavy knife to shave off the wax and then pack it into the teaspoon. You can also buy beeswax in pellet form (much easier to deal with) or if you don't want to buy a lot of wax, a chopped beeswax tea light will do.
*Lip balm containers can be found at some health food stores or on Etsy
*I quadruple the recipe to fill approx 12-0.15oz containers (standard twist up size)

Friday, May 11, 2012

DIY Mother's Day Flower Pots


Here's a pretty, handmade gift for the mom in your life this Mother's Day. It cost us under $15 and can be finished in a lazy afternoon.


Supplies:
Clay Pot; big enough to hold your herbs or flowers
Dirt
Permanent Marker
Chalkboard Paint 
Masking Tape
Optional: acrylic paint for a border


We taped off a rectangle with the masking tape and painted it with blackboard paint according to the directions on the bottle. When it was dry, we peeled off the tape and wrote on the opposite side with Sharpies. Once we had planted our basil, we added the white border and left it to dry.

Monday, March 19, 2012

Tutorial: DIY Forward Facing Bookselves


I love forward facing bookshelves and have been wanting to buy some for quite a while. I'd been putting off making a purchase and snooping for tutorials for a while when I finally found a great tutorial on JOT.

In true Freya style, I skimmed the tut and winged it. Here's how I DIY'd all four of these shelves for under $25 including paint. It was actually really easy, especially since they did the cuts for free at the hardware store.

Supplies:
2x2x8 lumber (mine were cut into 4' lengths by the guy at Home Depot)
Trim, 2.5-3" tall and cut to the same length as your lumber. I used flat back baseboard trim with a simple profile.
Glossy Paint. Glossy is more durable. I used quick dry spray, but any kind you like works.
Flathead Wood Screws #12 x 3". We used 3 screws per 4' length
1.5" Finishing nails
Drill
Hammer or Nail Gun
Stud Finder
Level
Measuring Tape

1.) Paint your wood and trim the day before.


2.) Pick your spot on the wall. Use the stud finder to locate your studs and shift your position so the spacing is reasonably even. Using your level, make marks, on the studs, where you want the screws to go. We put the center screw on one stud and the outside screws into the next stud on either side.


3.) Pre-drill holes into the lumber and the wall. Staring in the center, screw the lumber to the wall. Check for level BEFORE you screw the end screws in!


4.) Decide on your spacing and continue on up the wall. We used 16" gaps between each of our 4 shelves.


5.) Nail trim to the front of your shelves. Make sure the bottom and corners are flush and nail away. Space the nails differently than the screws so you don't nail into metal! We used 4 nails on each shelf.


6.) Done! I just touched up the nail heads with a little white craft paint and that was it. The project only took and hour and a half or so after the painting was done.


One of my best bang-for-the-buck DIY projects so far. $2 per 2x2x8, $0.59 per foot for the trim, $8 for screws and nails and $5 for paint = $22 total!

Monday, March 12, 2012

DIY Curtains for our New Kura Loft Bed


Daniel's room is very tiny and so we just just got a new Kura reversible/loft bed to try and open up some play space. I immediately knew that I wanted to make the space underneath into a fun little hideout. Curtains seemed like the right idea to soften and cozy up the space, while adding something interesting to look at. I sewed panels of fabric, in random widths, together for a patchwork look and pinned the 2 panels up with upholstery tacks/finishing nails. If you wanted to totally tent off the bottom, you could add a tension rod and an extra curtain across the front as well.


I was a little dark under the bed, so I bought 2 Larga Spotlights from Ikea and clamped them onto the bedposts at either end of the bed. They open just enough to fit on and they were only $4 each. It really brightened up the space, and once I'm finished the rest of his room, it will become a reading nook.


And for one last little custom touch, I added an old laundry bag to the end of the bed with a couple over-the-door hooks. It's full of our way-too-big collection of stuffed animals. One day, I might make a bag that co-ordinates with the curtain, but an already made bag was just too tempting to resist!

Hopefully you'll see more of this small space update soon. I have some great ideas!

Friday, March 2, 2012

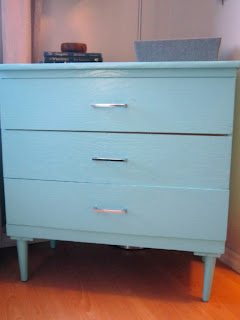
Before and After: Updated Vintage Dresser Project


Now that my handsome handyman has installed the new handles, I have a before and after photo to show off. My $10 thrift store find had a face lift, and it looks 20 years younger!


The hardest part of this project was filling in the screw holes for the old handles, since they were not a standard size. I just used drywall mud, let it dry well, sanded the holes, primed the whole thing and painted it with 2 coats of high gloss paint. The paint and primer cost me about $25, the handles another $25 bringing the total to $60!

I was planning on putting this dresser in the hall by my bathroom, since we don't have a linen closet, but I changed my mind. I painted it in a friends garage and when I brought it home and saw it in the living room/entry (oh, the joys of small space living) I knew it was a perfect fit. It gives us extra storage for mittens, work bags, sunscreen and all those things you need when you're heading out.

I added a slightly retro lamp from Ikea, a mail sorter and invisible bookshelves by Umbra and a little tabletop organizer with compartments for our phones and wallets. Thanks to all my friends and FB fans for your color advice!

Friday, February 24, 2012

Easy Custom DIY Decor- Yarn and Twine Wrapped Ball Tutorial


Here's a super easy project that you can customize for your color scheme; yarn wrapped balls.

Materials:
Glue Gun or Glue Dots
Yarn/Twine/String/Rope
Styrofoam balls in desired sizes

Instructions:
1.) Glue one end of your yarn to the Styrofoam ball.
2.) Wrap and wrap until it's all covered and looks pretty.
3.) Cut the yarn and glue the other end down.

Yup, easy as 1-2-3. A cool DIY design project done in 20 minutes.


This would be a great housewarming or hostess gift! Easy, cheap, fast and made to co-ordinate with their decor!

Thursday, December 15, 2011

Tutorial Trial: Dyed Mason Jars


I've been loving all the gorgeous vintage Ball jars in green and blue, but I figured that there must be a way to DIY it, and there is! There are lots of methods and tutorials all over the place and I read a ton and tried it myself.

Materials:
Mason Jars
Mod Podge
Food coloring

1) Mix your color. I used about a 1/2 cup of Mod Podge and added 3-5 drops of blue food coloring and 2-3 or green. I had to wing it a bit to get the shade/depth of color I wanted.


2.) Thin your mixture out a little with water. I swirled it around the jars and let the excess drip off. I should have painted it on though, I think. Mine had some drips and I think I'd rather brush strokes than drips.

3) Cure them in the oven for about an hour on the lowest setting it has. I'm pretty happy with how they turned out, although the real deal is way cuter!


Monday, November 28, 2011

Vintage and Salvaged Frames into Chalkboards: Tutorial


I ended up with an extra table to fill in a week at my last craft sale (don't ask...) and I wanted to make grown up things for a change. I went scouting at a few thrift stores and found some awesome frames. The plan was to spray paint the frames in nice lively colors and spray paint the glass in chalkboard paint, but as you know, something always goes wrong when I'm crafting something new!

What you need:
Frames
Chalkboard paint (spray or paint on)
Spray paint
Drop Cloth

It turns out that vintage frames are often made a lot differently than modern ones, which mean ripping out nails and hammering them back in and accidentally breaking glass that was seemingly permantently affixed. On one frame, it seemed that the glass was actually trapped in the wood somehow. On that one, I taped off the frame and painted, rather than spraying.

On the ones without glass, or where I broke the glass (wah!) I tried many things. First I called Michael's to ask about custom cut glass, but it was super expensive. Then I went to Home Depot to look for small cuts of sheet metal (magnetic!) or plywood, but no one could help me troubleshoot. I eventually came home and used some fiberboard/poster board from my office supply stash and it worked like a charm.

There was lots of troubleshooting, but the results were great, and people loved the big ones! I think I'll try it again, now that I know what I'm doing!

Tuesday, November 8, 2011

Ikea Hack: Lack Coffee Table into a Headboard


I feel like a genius! I'm always checking out Ikea Hackers and thinking how clever all the designers are, and now I've done it myself in less than 30 minutes!


We have a guest for the next few months and needed somewhere temporary, but comfortable for her to stay. I wanted to buy a bed frame, but when I realized my old Lack tabletop is the same length as a single bed, I got pretty excited.


I used a Magic Eraser (awful chemicals, but it did resurrect my old dingy table) to shine it up, and spray glued pieces of fabric onto the frame. I pulled the mattress out a couple inches and rested the headboard on the the box spring. Simple is usually the best.

Friday, October 28, 2011

Easy-Peasy DIY Wall Art


I found this genius idea somewhere on the world wide web and had to use it immediately! We're slowly re-decorating our house and there was a perfect unused spot on the wall for these little gems. All you need are embroidery hoops and fabric. So easy, and so darling!

Saturday, October 22, 2011

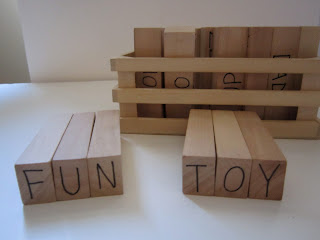
Easy Wooden Alphabet Blocks Tutorial


Here are a few lost photos of some ABC blocks I made for Daniel when he was learning his letters. He still loves them and now he's using them to spell. They're so easy to make!

Supplies:
Jenga Blocks (I used a no-name brand and saved a few dollars)
Permanent Marker, preferably non-toxic
Paper
Optional-Stencils, if you don't like drawing!


1.) Plan your simple drawings for each letter on the sheet of paper. Simple is best. Here are the objects I used, in alphabetical order:
Apple, Balloon, Candles, Duck, Egg, Fire, Gingerbread man, Hat, Ice cream, Juicebox, Kite, Leaf, Mittens, Nose, Oven, Pencil, Queen, Rabbit, Stars, Teepee, Umbrella, Vacuum, Watermelon, Xylophone, Yarn, Zipper.

2.) Start drawing! It only took me one evening for the whole project because I made everything as simple as possible. I drew the upper and lower case letter with a picture of an object starting with that letter on one side, and left the other blank. I repeated the capital letter on both ends of the block as well.

3.) I used a few of the extra blocks for simple sight words as well. Right after I gave Daniel his blocks, he saw a coupon (he had just turned 3) and said "Mommy, why does this paper say 'off'?" I just about fell over! I wrote one word on each side On/Off, Mom/Dad, Open/Close, Yes/No, Go/Stop, Hi/Bye etc.


This is a great gift because you can personalize it for your child with color, drawings and sight words that you think they'd enjoy!

Wednesday, October 19, 2011

10 Minute Piggy Bank

Who doesn't love a great "no skills required" craft once in a while? This little project reminds me that simple, re-purposed materials are usually the most intriguing for a child.


A few months ago bought some lovely organic cream that came in a glass bottle (it makes me wish I enjoyed home-coffee as much as store-coffee so I could buy more cream).  I just couldn't resist the container and when I was done I didn't want to put it into the recycling bin, so I gave it to Daniel to play with.


My Dad was visiting and watching Daniel 'plink' the coins into the bottle when he suggested we make it into a real piggy bank. He just cut a little slot into the lid with a utility knife and it was done. It's been a favorite toy for quite a few months now. Good call by Papa!

Tuesday, October 4, 2011

Handmade Wooden Block Puzzle: Adorable Animals


Here is part of the baby shower gift I made for my little peanut. I think it's my favorite because my hubs helped me make it!


Simple but not easy. All it took was drawing out the animal pictures and wood burning them. I drew and Michael did the wood burning. I finished it off with beeswax polish and voila! A beautiful, natural, handmade baby gift that will actually get used!


I thought about using 6 blocks, but even my clever four year old has trouble with 6 blocks, so I just kept it simple at 4.

You Might Also Like:

Related Posts Plugin for WordPress, Blogger...