Showing posts with label turquoise. Show all posts

Friday, March 2, 2012

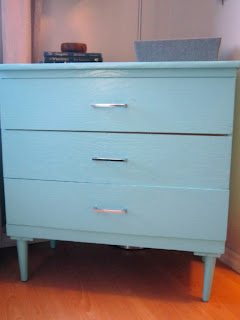
Before and After: Updated Vintage Dresser Project


Now that my handsome handyman has installed the new handles, I have a before and after photo to show off. My $10 thrift store find had a face lift, and it looks 20 years younger!


The hardest part of this project was filling in the screw holes for the old handles, since they were not a standard size. I just used drywall mud, let it dry well, sanded the holes, primed the whole thing and painted it with 2 coats of high gloss paint. The paint and primer cost me about $25, the handles another $25 bringing the total to $60!

I was planning on putting this dresser in the hall by my bathroom, since we don't have a linen closet, but I changed my mind. I painted it in a friends garage and when I brought it home and saw it in the living room/entry (oh, the joys of small space living) I knew it was a perfect fit. It gives us extra storage for mittens, work bags, sunscreen and all those things you need when you're heading out.

I added a slightly retro lamp from Ikea, a mail sorter and invisible bookshelves by Umbra and a little tabletop organizer with compartments for our phones and wallets. Thanks to all my friends and FB fans for your color advice!

Tuesday, November 29, 2011

Adorable New Hat for the Winter


Giddy Up and Grow has so many beautiful things. I've been drooling for quite some time, but I don't usually wear hair accessories, so I've been waiting and watching. When I saw this bow, I couldn't resist any more, especially since I knew exactly how I wanted to use it: as perfect embellishment for a crocheted hat!

Wednesday, October 12, 2011

Fabric Covered Bulletin Board


 This is such a super easy project that made the colors in my craft room really come together. A lovely friend of mine gave me a bulletin board with a pretty frame for my birthday, and now that I've added my fabric it looks double-amazing! I think I shall call it "almost art".


All I had to do was take the cork board out of the frame, cover with fabric and put it back in. I didn't even staple or tape it. Now, when my son draws me a picture we cut a piece out and tack it on the board, the rest goes into the recycling. I'm very glad he doesn't get too attached to his pictures!

Wednesday, September 7, 2011

DIY Craft Room/Office Makeover Revealed!

Finally, I'm done. Well...mostly. I still need to reorganize my closet, but it's good enough for now!

My desk. Notice the pipe-cleaner decor by Daniel.

I'm ever-so-pleased with how the red/turquoise/blue color scheme turned out. It's subtle since it's mostly in the accessories, but gives the space a little creative 'pop'.


I love the kid-friendly crafting space. With the junk pile we had going on before, I was always shooing Daniel out or stressed because of the mess, but now he is a crafting-machine! I love, love, love the small lack shelves at his height. Anything I want him to be able to reach himself goes there and he can just help himself.


The best part for me is definitely the shelves above my sewing table. They look nice, store a ton of fabric and other bits and pieces and keep things close by, but out of the way!

My beloved Lack shelving holding my fabric stash!

A plastic tray holds all my sewing notions

Storage is everywhere! I have so much storage now, some of it is even empty! I have plastic drawer units and hanging shelves in the closet, boxes and buckets, and shelving everywhere. How dreamy!


Pretty much everything is from Ikea which kept cost down and the look consistent, which I think makes a small space look bigger. Hooray for an efficient, pretty space to create in!

Monday, June 13, 2011

Hegehog Themed Baby Shower Gift

I've outdone myself! My first baby gift basket was cute, but this one is to die for!


It all started with finding this adorable wooden hedgehog clock at Superstore. I knew it would look perfect in my goddaughter's room, although I was tempted to keep it for myself!

I found this great hedgehog softie tutorial and whipped one up right away in Michael Miller's Hegehog's color scheme.


I added a Bagsket to hold it all, and although the colors won't match baby's room, it will be a great tote for car toys.


Next month, I plan on hosting a second shower for a different crowd and I have a few things up my sleeve for my little peanut. Can't wait to show you!

Thursday, January 6, 2011

Glittery Christmas Reindeer (or "how to make a huge mess when you're already obscenely busy")

I had the Dayhome Christmas party on the last day that the kids were here. Usually we do a few activities, or a craft and I give them each a gift. This year I thought it would be a great idea to combine the party craft with the craft we make for parents. Oops. At least it turned out cute!

You'll need:
Spray adhesive (We used Elmers, but next time I'd try something else)
Glitter (Martha Stewart glitter worked best for us)
Something to Glam Out. Thrift stores often have ceramic deer figures, or you can use plastic animals, or anything your heart desires.
A lot of newspaper


I found these sweet little acrylic reindeer at Superstore (on clearance!) and thought they'd be perfect.


Spray the whole object with the spray adhesive, one object at a time. The glue becomes less tacky if you wait.


Shake glitter all over the place. We ended up taking handfuls of sparkles and rubbing them right on as well, there were a lot of grooves in these things! Notice how my hands look after about 4 seconds.


I also added a coat of Krlyon Acrylic Crystal Clear spray paint to prevent the glitter from coming off, but I don't think it did much. They look adorable, but I spent weeks cleaning the floors and washing glitter out of every imaginable place! Next year when I pull them out, I am going to tie bright purple ribbon around their necks. Cute!

Tuesday, August 10, 2010

Homemade Sling: Stretchy Wrap

I think every new mom should have a good sling, which is why I made one for my friend Cara and her partner, Nathan to use with their new little one, Brenna.

Photo Courtesy of Nathan Hall

It was almost so easy! I read some tutorials here on Make Baby Stuff and a few other tips and tut's here and there. It sounded like 4m of a good quality jersey was enough. So that's what I bought. But actually I needed 5m. So, the troubleshooting started and, with the help of a talented friend, I decided to put a 1m panel in the center. I found a beautiful (and ridiculously expensive) batik print on clearance and snagged it up.

At this point I actually got excited about my mistake because it meant I could use a more expensive print on future slings and not break the bank! The batik was considerably less stretchy and didn't have a lot of give. I was a bit worried, but it is actually more supportive for babe while still allowing you to pull it over baby's body without much work.


My sewer friend, Darcie, showed me how to sew the panel on so it would be secure (a French seam, Darcie?). And when I was sure that is would hold, I top stitched just to make sure! It took a loooong time to hem 5m of fabric. I didn't pin, just rolled it under in sections as I went. The batik was very fussy and I don't know if I would use it again. Next time I may try and taper the ends at a gentle angle for the last half meter or so on each end. It makes tying easier, but I wasn't brave enough to try it my first time.

I'm so happy it turned out and that Nathan and Cara are using it!


This is me trying Daniel in the sling to make sure it would hold up to a toddlers weight. He looks so tall!

You Might Also Like:

Related Posts Plugin for WordPress, Blogger...