Showing posts with label no sew toy. Show all posts
Showing posts with label no sew toy. Show all posts
Saturday, October 22, 2011
Easy Wooden Alphabet Blocks Tutorial
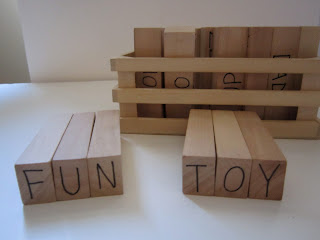
Here are a few lost photos of some ABC blocks I made for Daniel when he was learning his letters. He still loves them and now he's using them to spell. They're so easy to make!
Supplies:
Jenga Blocks (I used a no-name brand and saved a few dollars)
Permanent Marker, preferably non-toxic
Paper
Optional-Stencils, if you don't like drawing!
1.) Plan your simple drawings for each letter on the sheet of paper. Simple is best. Here are the objects I used, in alphabetical order:
Apple, Balloon, Candles, Duck, Egg, Fire, Gingerbread man, Hat, Ice cream, Juicebox, Kite, Leaf, Mittens, Nose, Oven, Pencil, Queen, Rabbit, Stars, Teepee, Umbrella, Vacuum, Watermelon, Xylophone, Yarn, Zipper.
2.) Start drawing! It only took me one evening for the whole project because I made everything as simple as possible. I drew the upper and lower case letter with a picture of an object starting with that letter on one side, and left the other blank. I repeated the capital letter on both ends of the block as well.
3.) I used a few of the extra blocks for simple sight words as well. Right after I gave Daniel his blocks, he saw a coupon (he had just turned 3) and said "Mommy, why does this paper say 'off'?" I just about fell over! I wrote one word on each side On/Off, Mom/Dad, Open/Close, Yes/No, Go/Stop, Hi/Bye etc.
This is a great gift because you can personalize it for your child with color, drawings and sight words that you think they'd enjoy!
Labels:
abc,
alphabet,
calgary craft sale,
cheap wooden toy,
children,
christmas gift,
easy,
educational,
gift,
handmade,
homemade,
how to,
kids,
no sew toy,
simple,
toy,
toys,
tutorial,
wooden
Wednesday, October 19, 2011
10 Minute Piggy Bank
Who doesn't love a great "no skills required" craft once in a while? This little project reminds me that simple, re-purposed materials are usually the most intriguing for a child.
A few months ago bought some lovely organic cream that came in a glass bottle (it makes me wish I enjoyed home-coffee as much as store-coffee so I could buy more cream). I just couldn't resist the container and when I was done I didn't want to put it into the recycling bin, so I gave it to Daniel to play with.
My Dad was visiting and watching Daniel 'plink' the coins into the bottle when he suggested we make it into a real piggy bank. He just cut a little slot into the lid with a utility knife and it was done. It's been a favorite toy for quite a few months now. Good call by Papa!
Labels:
children,
easy,
fast,
glass,
glass jar,
handmade,
homemade,
homemade piggy bank,
kids,
lid,
no sew,
no sew gift,
no sew toy,
piggy bank,
project,
recycled,
repurposed,
reuse,
simple,
tutorial
Subscribe to:
Posts (Atom)


