Showing posts with label wooden. Show all posts

Wednesday, September 18, 2013

Bad Blogger, Bad!

I've been a terribly negligent blogger since little Asher was born! Here are just a few things I've been creating since my last post:


Crinkle Toys

Custom I Spy Pillow

Custom Change Pads

Crinkly Teething BonBons

Custom Bandana Bibs

Teething/Nursing Necklaces

Custom Doll Wraps

Gnome Stackers


See?!? I've been busy! If you're trying to keep up with Bug & Bird, come find me on Facebook. I'm less negligent there!

Thursday, November 22, 2012

Wands, Pop-Tops and Blackboards: Oh My!


Here's a little sneak peek of a few of the new items I'll be bringing along to my only Holiday craft sale of 2012 on December 1st. There will be at least one more new item debuting at the sale. I'll also be sponsoring a Magnet-decorating fundraiser for Attachment Parenting Village Calgary. The magnets will make a great gift for kids to give to grandparents, siblings or friends. Hope to see you at the Sunalta Community Center from 10-3 on the 1st!

Saturday, October 22, 2011

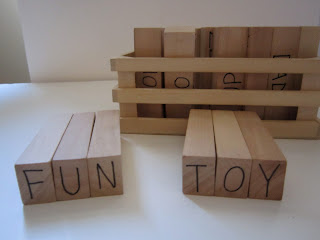
Easy Wooden Alphabet Blocks Tutorial


Here are a few lost photos of some ABC blocks I made for Daniel when he was learning his letters. He still loves them and now he's using them to spell. They're so easy to make!

Supplies:
Jenga Blocks (I used a no-name brand and saved a few dollars)
Permanent Marker, preferably non-toxic
Paper
Optional-Stencils, if you don't like drawing!


1.) Plan your simple drawings for each letter on the sheet of paper. Simple is best. Here are the objects I used, in alphabetical order:
Apple, Balloon, Candles, Duck, Egg, Fire, Gingerbread man, Hat, Ice cream, Juicebox, Kite, Leaf, Mittens, Nose, Oven, Pencil, Queen, Rabbit, Stars, Teepee, Umbrella, Vacuum, Watermelon, Xylophone, Yarn, Zipper.

2.) Start drawing! It only took me one evening for the whole project because I made everything as simple as possible. I drew the upper and lower case letter with a picture of an object starting with that letter on one side, and left the other blank. I repeated the capital letter on both ends of the block as well.

3.) I used a few of the extra blocks for simple sight words as well. Right after I gave Daniel his blocks, he saw a coupon (he had just turned 3) and said "Mommy, why does this paper say 'off'?" I just about fell over! I wrote one word on each side On/Off, Mom/Dad, Open/Close, Yes/No, Go/Stop, Hi/Bye etc.


This is a great gift because you can personalize it for your child with color, drawings and sight words that you think they'd enjoy!

Tuesday, October 4, 2011

Handmade Wooden Block Puzzle: Adorable Animals


Here is part of the baby shower gift I made for my little peanut. I think it's my favorite because my hubs helped me make it!


Simple but not easy. All it took was drawing out the animal pictures and wood burning them. I drew and Michael did the wood burning. I finished it off with beeswax polish and voila! A beautiful, natural, handmade baby gift that will actually get used!


I thought about using 6 blocks, but even my clever four year old has trouble with 6 blocks, so I just kept it simple at 4.

Thursday, August 19, 2010

GIVEAWAY!!!


I am so excited for my first giveaway! From now til September 1st you have the chance to win a beautiful wooden teething ring, with a beeswax finish and cotton crochet panel.

Here's how to enter:

-Check out my new Esty store
-Leave me a comment (with a link to your blog) and tell me what item you liked best in my store when you're done!

-For an extra entry blog about the giveaway, or if you don't have a blog, tweet or link to me in a facebook post and leave me the specific URL in your comment.

I will do a random drawing in the first week of September!

Sunday, July 18, 2010

Cute Little Matching Game

I just finished making the cutest birthday gift for Daniel. I can't believe he's almost 3!!! He's just starting to understand the concept of playing simple games so I'd been looking around for a matching game for him, when I realized I could make one.

I originally planned on stamping them, but couldn't find a stamp set that I loved so I decided to go a different route. I drew little woodland creatures and objects on them and asked my mom if she would woodburn over my designs (thanks mom!) and found a perfect little wooden box to put them in. I polished the box with this recipe.

I am so pleased with how it turned out and can't wait to play matching with Daniel in a few weeks!

Perfect size for little hands!

You Might Also Like:

Related Posts Plugin for WordPress, Blogger...