Showing posts with label cheap wooden toy. Show all posts
Showing posts with label cheap wooden toy. Show all posts
Saturday, October 22, 2011
Easy Wooden Alphabet Blocks Tutorial
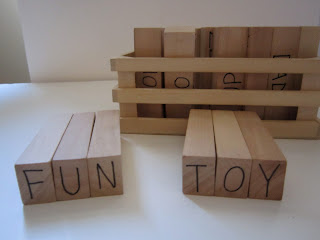
Here are a few lost photos of some ABC blocks I made for Daniel when he was learning his letters. He still loves them and now he's using them to spell. They're so easy to make!
Supplies:
Jenga Blocks (I used a no-name brand and saved a few dollars)
Permanent Marker, preferably non-toxic
Paper
Optional-Stencils, if you don't like drawing!
1.) Plan your simple drawings for each letter on the sheet of paper. Simple is best. Here are the objects I used, in alphabetical order:
Apple, Balloon, Candles, Duck, Egg, Fire, Gingerbread man, Hat, Ice cream, Juicebox, Kite, Leaf, Mittens, Nose, Oven, Pencil, Queen, Rabbit, Stars, Teepee, Umbrella, Vacuum, Watermelon, Xylophone, Yarn, Zipper.
2.) Start drawing! It only took me one evening for the whole project because I made everything as simple as possible. I drew the upper and lower case letter with a picture of an object starting with that letter on one side, and left the other blank. I repeated the capital letter on both ends of the block as well.
3.) I used a few of the extra blocks for simple sight words as well. Right after I gave Daniel his blocks, he saw a coupon (he had just turned 3) and said "Mommy, why does this paper say 'off'?" I just about fell over! I wrote one word on each side On/Off, Mom/Dad, Open/Close, Yes/No, Go/Stop, Hi/Bye etc.
This is a great gift because you can personalize it for your child with color, drawings and sight words that you think they'd enjoy!
Labels:
abc,
alphabet,
calgary craft sale,
cheap wooden toy,
children,
christmas gift,
easy,
educational,
gift,
handmade,
homemade,
how to,
kids,
no sew toy,
simple,
toy,
toys,
tutorial,
wooden
Tuesday, October 12, 2010
Hand Dyed Magnet Tutorial
I just tried dyeing wood for the first time and it went quite well. So well, in fact, that I've posted the final product on my Etsy shop, but I wanted to give my readers the opportunity to try this one out themselves!
 How to Dye Wood with Food Coloring:
1.) In a bowl, mix boiling water (1-4 cups depending on batch size), food coloring (enough to make the water brightly colored) and unfinished wooden cutouts (Michael's sells lots of shapes).
2.) Let sit for 15-45 min, or until the wood has absorbed enough dye. Stir every 5 minuted or so to ensure even coloring.
 3.) Remove wood for food coloring. Use gloves, or wash your hands RIGHT AWAY! Food coloring stains like crazy! Place on paper towel lined plate and let dry. It took mine a full 24 hours before being dry, and I turned them a few times.
How to Make Magnets from Dyed Wooden Cutouts:
1.) Make sure wood is DRY!
2.) Stamp images onto the best looking side of the cutout. I use Archival ink, but you can use acrylic paint (test it first and wash paint off the stamp immediately), water proof ink, or paint your own design on.
3.) Dab of hot glue on the back side of the cutout and stick the magnet on.
TA DA! It's simple, but time consuming.
These little magnets make great stoking stuffers, add-ins to gifts, kids gifts (careful though, can be a choking hazard), favors, or a little something to top gift wrap with. I'd love to see some in red and green for Christmas party favors!
Subscribe to:
Posts (Atom)


