Showing posts with label home decor. Show all posts
Showing posts with label home decor. Show all posts
Monday, March 19, 2012
Tutorial: DIY Forward Facing Bookselves
I love forward facing bookshelves and have been wanting to buy some for quite a while. I'd been putting off making a purchase and snooping for tutorials for a while when I finally found a great tutorial on JOT.
In true Freya style, I skimmed the tut and winged it. Here's how I DIY'd all four of these shelves for under $25 including paint. It was actually really easy, especially since they did the cuts for free at the hardware store.
Supplies:
2x2x8 lumber (mine were cut into 4' lengths by the guy at Home Depot)
Trim, 2.5-3" tall and cut to the same length as your lumber. I used flat back baseboard trim with a simple profile.
Glossy Paint. Glossy is more durable. I used quick dry spray, but any kind you like works.
Flathead Wood Screws #12 x 3". We used 3 screws per 4' length
1.5" Finishing nails
Drill
Hammer or Nail Gun
Stud Finder
Level
Measuring Tape
1.) Paint your wood and trim the day before.
2.) Pick your spot on the wall. Use the stud finder to locate your studs and shift your position so the spacing is reasonably even. Using your level, make marks, on the studs, where you want the screws to go. We put the center screw on one stud and the outside screws into the next stud on either side.
3.) Pre-drill holes into the lumber and the wall. Staring in the center, screw the lumber to the wall. Check for level BEFORE you screw the end screws in!
4.) Decide on your spacing and continue on up the wall. We used 16" gaps between each of our 4 shelves.
5.) Nail trim to the front of your shelves. Make sure the bottom and corners are flush and nail away. Space the nails differently than the screws so you don't nail into metal! We used 4 nails on each shelf.
6.) Done! I just touched up the nail heads with a little white craft paint and that was it. The project only took and hour and a half or so after the painting was done.
One of my best bang-for-the-buck DIY projects so far. $2 per 2x2x8, $0.59 per foot for the trim, $8 for screws and nails and $5 for paint = $22 total!
Labels:
bookshelves,
cheap,
children,
diy,
easy,
fast,
forward facing,
front facing,
home decor,
how to,
kids books,
kids room,
library,
project,
quick,
shelves,
simple,
storage,
tutorial
Friday, March 2, 2012
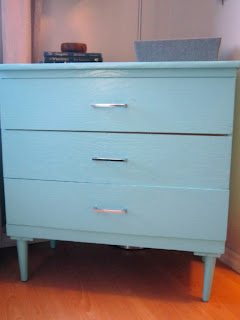
Before and After: Updated Vintage Dresser Project
Now that my handsome handyman has installed the new handles, I have a before and after photo to show off. My $10 thrift store find had a face lift, and it looks 20 years younger!
The hardest part of this project was filling in the screw holes for the old handles, since they were not a standard size. I just used drywall mud, let it dry well, sanded the holes, primed the whole thing and painted it with 2 coats of high gloss paint. The paint and primer cost me about $25, the handles another $25 bringing the total to $60!
I was planning on putting this dresser in the hall by my bathroom, since we don't have a linen closet, but I changed my mind. I painted it in a friends garage and when I brought it home and saw it in the living room/entry (oh, the joys of small space living) I knew it was a perfect fit. It gives us extra storage for mittens, work bags, sunscreen and all those things you need when you're heading out.
I added a slightly retro lamp from Ikea, a mail sorter and invisible bookshelves by Umbra and a little tabletop organizer with compartments for our phones and wallets. Thanks to all my friends and FB fans for your color advice!
Labels:
aqua,
before and after,
blue,
decorating,
diy,
dresser,
Entry,
furniture,
home,
home decor,
refinsh,
small spaces,
turquoise,
tutorial,
update,
vintage
Thursday, January 26, 2012
Redecorating Time!
It's been a while since I've posted! I've been completely consumed with family stuff and trying to redo my house. 7 years of living the student lifestyle and our home is desperate for an update! I've pretty much finished int he living room and kitchen, and now I'm onto the bedroom. Big job on a little budget, but it's pretty fun. Here are some of my inspiration photos and I will post 'After' photos as soon as I'm done.
Labels:
bed,
bedroom,
design,
gray,
grey,
home,
home decor,
house,
office makeover,
redecorate,
update,
yellow
Tuesday, December 20, 2011
A Vintage Treat for the Kitchen
I found this adorable vintage owl planter (so weird that people used to like tiny plants so much...) online at Out'A Space, a great Florida based vintage shop. It's so perfect to hold my scrub brushes, so happy that my kitchen is finally coming to completion. More photos soon!
Subscribe to:
Posts (Atom)


