Showing posts with label how to. Show all posts

Thursday, October 25, 2012

Easy Homemade Lip Balm Recipe


This lip balm is the best. I've tried all sorts of expensive natural chapstick and been disappointed every time. When I started using my homemade stuff, I was able to go from constant, all day application to once in the morning and once at bedtime!


Ingredients:
2 tsp coconut oil
1 tsp beeswax
1 vitamin E capsule
5-10 drops of sweet almond oil 
*optional 5-10 drops essential oil such as sweet orange, peppermint, vanilla or cinnamon

Melt it all in a pan (be clever and use one that pours well) on low heat. If using essential oils, add after removing from the heat. Pour into containers.


Tips:
 *I bought a big brick of beeswax from a honey supplier. I use a sharp, heavy knife to shave off the wax and then pack it into the teaspoon. You can also buy beeswax in pellet form (much easier to deal with) or if you don't want to buy a lot of wax, a chopped beeswax tea light will do.
*Lip balm containers can be found at some health food stores or on Etsy
*I quadruple the recipe to fill approx 12-0.15oz containers (standard twist up size)

Friday, May 11, 2012

DIY Mother's Day Flower Pots


Here's a pretty, handmade gift for the mom in your life this Mother's Day. It cost us under $15 and can be finished in a lazy afternoon.


Supplies:
Clay Pot; big enough to hold your herbs or flowers
Dirt
Permanent Marker
Chalkboard Paint 
Masking Tape
Optional: acrylic paint for a border


We taped off a rectangle with the masking tape and painted it with blackboard paint according to the directions on the bottle. When it was dry, we peeled off the tape and wrote on the opposite side with Sharpies. Once we had planted our basil, we added the white border and left it to dry.

Monday, May 7, 2012

Picnic Perfect Lemonade by the Jar


This lemonade is the best I've ever made and it only takes 3 steps, 2 ingredients and I made 4 jars in less than 5 minutes. I'm thinking I could even add a shot of vodka for hard lemonade for a grown up BBQ!


Supplies & Ingredients:

250 mL Mason Jars (as many as you'd like!)
Measuring Cup and Spoons
Sugar
Lemon Juice
Hot (or boiling) water
Ice Cubes

1.) Add 1 heaping Tbsp of sugar and an inch of hot tap water to each mason jar. Put on the lid and shake to dissolve the sugar.


2.) Add 30 mL (2 Tbsp, 1/8 cup) or lemon juice to each jar.

3.) Pack full of ice cubes and screw the lid on. It will be perfect by the time you unpack your picnic lunch, just give it a little shake before you open it!


If you plan on drinking it right away, add 2-3 ice cubes and fill the rest of the way with cold water. Yum!

Monday, March 19, 2012

Tutorial: DIY Forward Facing Bookselves


I love forward facing bookshelves and have been wanting to buy some for quite a while. I'd been putting off making a purchase and snooping for tutorials for a while when I finally found a great tutorial on JOT.

In true Freya style, I skimmed the tut and winged it. Here's how I DIY'd all four of these shelves for under $25 including paint. It was actually really easy, especially since they did the cuts for free at the hardware store.

Supplies:
2x2x8 lumber (mine were cut into 4' lengths by the guy at Home Depot)
Trim, 2.5-3" tall and cut to the same length as your lumber. I used flat back baseboard trim with a simple profile.
Glossy Paint. Glossy is more durable. I used quick dry spray, but any kind you like works.
Flathead Wood Screws #12 x 3". We used 3 screws per 4' length
1.5" Finishing nails
Drill
Hammer or Nail Gun
Stud Finder
Level
Measuring Tape

1.) Paint your wood and trim the day before.


2.) Pick your spot on the wall. Use the stud finder to locate your studs and shift your position so the spacing is reasonably even. Using your level, make marks, on the studs, where you want the screws to go. We put the center screw on one stud and the outside screws into the next stud on either side.


3.) Pre-drill holes into the lumber and the wall. Staring in the center, screw the lumber to the wall. Check for level BEFORE you screw the end screws in!


4.) Decide on your spacing and continue on up the wall. We used 16" gaps between each of our 4 shelves.


5.) Nail trim to the front of your shelves. Make sure the bottom and corners are flush and nail away. Space the nails differently than the screws so you don't nail into metal! We used 4 nails on each shelf.


6.) Done! I just touched up the nail heads with a little white craft paint and that was it. The project only took and hour and a half or so after the painting was done.


One of my best bang-for-the-buck DIY projects so far. $2 per 2x2x8, $0.59 per foot for the trim, $8 for screws and nails and $5 for paint = $22 total!

Friday, February 24, 2012

Easy Custom DIY Decor- Yarn and Twine Wrapped Ball Tutorial


Here's a super easy project that you can customize for your color scheme; yarn wrapped balls.

Materials:
Glue Gun or Glue Dots
Yarn/Twine/String/Rope
Styrofoam balls in desired sizes

Instructions:
1.) Glue one end of your yarn to the Styrofoam ball.
2.) Wrap and wrap until it's all covered and looks pretty.
3.) Cut the yarn and glue the other end down.

Yup, easy as 1-2-3. A cool DIY design project done in 20 minutes.


This would be a great housewarming or hostess gift! Easy, cheap, fast and made to co-ordinate with their decor!

Thursday, February 9, 2012

Using Small Spaces- Kids Corner on the Stairs


My house is pretty little, and I'm starting to learn how to make the most of my nooks and crannies! Here's a little spot on the stairs that I created in less than 30 minutes with chalkboard stickers and vintage flash cards.


To string up my vintage Sesame Street flashcards I just tied string onto cute push pins and stuck them in the wall. If they're too loose, they droop a lot, so pull the string tight! I used a flat white tack in the corner so it was less noticeable (although I took the photos before I changed them out). I found some sweet mini clothespins to attach the cards with, although binder clips or even paper clips would work too.

I'm still looking for some way to store the chalk on the wall, so for now, we're using a mason jar to hold the chalk and the brush.


More redesigned nooks and crannies to follow soon!

Thursday, December 15, 2011

Tutorial Trial: Dyed Mason Jars


I've been loving all the gorgeous vintage Ball jars in green and blue, but I figured that there must be a way to DIY it, and there is! There are lots of methods and tutorials all over the place and I read a ton and tried it myself.

Materials:
Mason Jars
Mod Podge
Food coloring

1) Mix your color. I used about a 1/2 cup of Mod Podge and added 3-5 drops of blue food coloring and 2-3 or green. I had to wing it a bit to get the shade/depth of color I wanted.


2.) Thin your mixture out a little with water. I swirled it around the jars and let the excess drip off. I should have painted it on though, I think. Mine had some drips and I think I'd rather brush strokes than drips.

3) Cure them in the oven for about an hour on the lowest setting it has. I'm pretty happy with how they turned out, although the real deal is way cuter!


Monday, November 28, 2011

Vintage and Salvaged Frames into Chalkboards: Tutorial


I ended up with an extra table to fill in a week at my last craft sale (don't ask...) and I wanted to make grown up things for a change. I went scouting at a few thrift stores and found some awesome frames. The plan was to spray paint the frames in nice lively colors and spray paint the glass in chalkboard paint, but as you know, something always goes wrong when I'm crafting something new!

What you need:
Frames
Chalkboard paint (spray or paint on)
Spray paint
Drop Cloth

It turns out that vintage frames are often made a lot differently than modern ones, which mean ripping out nails and hammering them back in and accidentally breaking glass that was seemingly permantently affixed. On one frame, it seemed that the glass was actually trapped in the wood somehow. On that one, I taped off the frame and painted, rather than spraying.

On the ones without glass, or where I broke the glass (wah!) I tried many things. First I called Michael's to ask about custom cut glass, but it was super expensive. Then I went to Home Depot to look for small cuts of sheet metal (magnetic!) or plywood, but no one could help me troubleshoot. I eventually came home and used some fiberboard/poster board from my office supply stash and it worked like a charm.

There was lots of troubleshooting, but the results were great, and people loved the big ones! I think I'll try it again, now that I know what I'm doing!

Tuesday, November 8, 2011

Ikea Hack: Lack Coffee Table into a Headboard


I feel like a genius! I'm always checking out Ikea Hackers and thinking how clever all the designers are, and now I've done it myself in less than 30 minutes!


We have a guest for the next few months and needed somewhere temporary, but comfortable for her to stay. I wanted to buy a bed frame, but when I realized my old Lack tabletop is the same length as a single bed, I got pretty excited.


I used a Magic Eraser (awful chemicals, but it did resurrect my old dingy table) to shine it up, and spray glued pieces of fabric onto the frame. I pulled the mattress out a couple inches and rested the headboard on the the box spring. Simple is usually the best.

Monday, October 31, 2011

No-Sew Franklin and Mrs. Turtle Costumes

We had a super-amazing church costume party on the weekend and here's how we went:


No sewing at all- my favorite. I cut the bellies out of fleece (you could use felt) and used quilters temporary spray glue to stick it to green shirts. I drew the lines with a brown fabric marker. Franklin's hat is a team hat that I covered with felt and adhered with the same spray glue.


My Mrs. Turtle necklace is made of purple ribbon and a wooden circle painted white.  Felt or a button would work for the charm as well. I used sticky velcro on the ends so it can come apart and hot glued the circle onto the ribbon.

We both had turtle-shell backpacks. One is a vintage ninja turtles backpack (doubles as a candy bag!) and the other was a handmade fleece kijiji find. I think one could definitely be made from fleece, hot glue, straps and stuffing in no time.

My little Franklin is just too cute!

Friday, October 28, 2011

Easy-Peasy DIY Wall Art


I found this genius idea somewhere on the world wide web and had to use it immediately! We're slowly re-decorating our house and there was a perfect unused spot on the wall for these little gems. All you need are embroidery hoops and fabric. So easy, and so darling!

Saturday, October 22, 2011

Easy Wooden Alphabet Blocks Tutorial


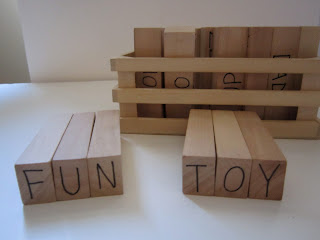
Here are a few lost photos of some ABC blocks I made for Daniel when he was learning his letters. He still loves them and now he's using them to spell. They're so easy to make!

Supplies:
Jenga Blocks (I used a no-name brand and saved a few dollars)
Permanent Marker, preferably non-toxic
Paper
Optional-Stencils, if you don't like drawing!


1.) Plan your simple drawings for each letter on the sheet of paper. Simple is best. Here are the objects I used, in alphabetical order:
Apple, Balloon, Candles, Duck, Egg, Fire, Gingerbread man, Hat, Ice cream, Juicebox, Kite, Leaf, Mittens, Nose, Oven, Pencil, Queen, Rabbit, Stars, Teepee, Umbrella, Vacuum, Watermelon, Xylophone, Yarn, Zipper.

2.) Start drawing! It only took me one evening for the whole project because I made everything as simple as possible. I drew the upper and lower case letter with a picture of an object starting with that letter on one side, and left the other blank. I repeated the capital letter on both ends of the block as well.

3.) I used a few of the extra blocks for simple sight words as well. Right after I gave Daniel his blocks, he saw a coupon (he had just turned 3) and said "Mommy, why does this paper say 'off'?" I just about fell over! I wrote one word on each side On/Off, Mom/Dad, Open/Close, Yes/No, Go/Stop, Hi/Bye etc.


This is a great gift because you can personalize it for your child with color, drawings and sight words that you think they'd enjoy!

Monday, October 17, 2011

Quiet Book #2- Around The House


Bring something cool and handmade to a baby shower, and you can bet you'll be making it again! Here's my second attempt at a simplified quiet book. I just couldn't find another 9 hours in my schedule to make a second 8-page book! I made it in an 'Around the House' theme, since children love to mimic adults more than anything.


Since it was a smaller book, I added a memory matching game (the bag is sewn in) on the inside cover. I think it fits with the theme of household activities, and little one can pretend to wash them, or add clothespins for some extra fun. The flowers button off for practice buttoning, just like the button snake. It's a great time-killer!


A simplified version of the oven and cookies, and a new addition. I adore this little garden, with it's package of seeds and watering can! I used fabric markers all through this book to speed the process up. It's so much faster than embroidering, and more fun too.


I love this idea for practice with brushing or braiding. It's a bit girly, and I usually try to make them unisex so they can be passed down, but I couldn't resist! The back cover has a pocket to add pieces for any of the activities, or paper and pencil.


Sending it for a test run to make sure it's as cool to a kid as it is to me!

Friday, April 8, 2011

Playsilk Fun!

Playsilks make dress-up games so entertaining! Daniel was very proud of his long blue hair.


We spent a whole afternoon making everyone into princesses (oh, son....) and dancing at the ball.

Silk Playground has lots of great ideas for putting your playsilks to work, including using one to line an Easter basket (what a great gift!) and for playing peek-a-boo.

Thursday, February 3, 2011

Easy Dinosaur Costume Tutorial


Daniel's preschool had Dino Day last week and I somehow missed them memo about dressing up or bringing along a dinosaur toy. Naturally, I chose the ridiculous option of making a costume myself the night before. Much easier than buying a $2 toy...right? Besides, I'm pretty sure there were at least 3 dinosaurs at Halloween.

I wanted it to be cheap, quick and fun so I decided to make the costume on a hoodie (we got ours at American Apparel) so I could take it apart and put the sweater in his closet.


You will need:
Hoodie in color of your choice
Stiff felt in contrasting/co-coordinating color (minimum cut, 0.2 m was plenty)
Regular felt (not flimsy craft felt) to match hoodie (0.2 m)
Stuffing (wool or recycled polyfil are best)
Enough elastic to go around your child's waist OR 2-3 safety pins


1. Fold the matching, soft felt in half. Cut a tail shape approx 4" tall and 20" long.


2. Cut triangles out of the stiff felt. I cut a 3" strip out of the felt and cut triangles with a base that is slightly smaller than the sides. Aprrox 3x3x2.5". Pin the triangles into the fold of the tail.


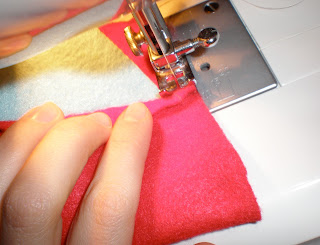
3. Trim the end of the tail to the edge of the last triangle and sew the triangles onto the tail. Stuff the tail.

4. Pinch the opening of the tail closed perpendicular to your seam and pin. 


5. Sew the tail shut. The beauty of using felt is that there is no turning. That's part of the reason this project is quick! You can either use safety pins to fasten the tail onto your child's pants, or sew a length of elastic (1 inch shorter than your child's waist measurement) onto the tail. I sewed mine on the under-side of the seam that closed the tail up.


 6. Cut more of the same size triangles out of the stiff felt and cut a small slit in the center of the bottom side of each triangle. You will need 4-6 depending on how big they are and how big the hood is.


7. Line each triangle up, one at a time, on the center seam of the hood. One side of the slit goes on the left of the seam, and one side on the right. Sew with a running stitch, and NO back stitching, along each side of the split to fasten the triangles. This is the hardest part.

I didn't back stitch and used a running stitch is so I can easily rip it out after. If you want yours to stay on forever, by all means do it differently!

8.  Next, I cut out little claws to attach onto the sleeves. Same thing, running stitch and no back stitching.


9. Now to embellish! I used small and large circles on the back and chest only. I tried using a fabric spray adhesive to keep the felt on the hoddie, but it wouldn't hold. I think if I could have found a thinner felt in the same blue, the spray adhesive would have worked. Instead, I sewed just a few stitches in the center of each circle so I could take them off easily.

Sparkly felt, an oval-shaped tummy on a pullover sweater or multiple colors would be fun too.


And here's my little dinosaur all dressed up. Ironically enough, he was the only one with a costume! Maybe I need to drink less coffee!

You Might Also Like:

Related Posts Plugin for WordPress, Blogger...