Tuesday, August 31, 2010

Aqua and Avocado Swap Gift!

Heidi at Foxgloves, Fabric and Folly hosted a vintage swap for all things Aqua and Avocado.  And I just got my package in the mail! I feel very spoiled!

My partner is fellow Canadian and Etsian Danielle Todd. You can find her work here -and FYI her prices are great!


Just look at all this loot! A necklace, bath sponge, fabric (well...actually a table runner, but to a sewer everything is fabric), buttons, recipe cards (I'm always out!) and my favorites: an awesome little casserole dish and coffee cup cuff.

I am wishing that I had tucked a few handmade things in as well, but knowing that she sews, I couldn't resist the piles of aqua and avocado linens that I found!


Thanks Danielle! Hope you enjoy yours as much as I enjoy mine!

Announcing Bug and Bird by Freya MacLean

I finally decided on a name for my Etsy shop, Bug and Bird by Freya MacLean. I was inspired by Daniel.... I have always called him my 'Little Bug' and he often calls me 'Mama Bird'.

I am so excited to finally have a name and get moving onto a logo and all those other little bits and pieces!

Just a reminder that my giveaway is closing tomorrow, so get in while you can!

More posting to come soon!
Mama Bird and Little Bug

Thursday, August 26, 2010

Fabric Bike Basket-Adventure in Troubleshooting

I fell in looooove with Anna's bicycle basket at Noodleheads, and lucky for me, she wrote a great tutorial too! I was convinced that this project would only take me an hour or so, but it soon became the bane of my existence and took more than 3 hours!!!! Here are some tips to avoid my mistakes (which, for the record, have nothing to do with the tutorial).


First of all, my fabric store didn't have any heavy weight, double-sided fusible interfacing. But the lady helping me didn't tell me that, she just gave me the next best thing which happened to be Heat and Bond Ultra. I DO NOT recommend it for this project. Oh...and my first cut was defective, so I had to go back for another one.

So here I am using Heat and Bond, which is rather floppy, to iron my lining to the shell- with it sliding down and wiggling every which way. So I pinned it, which is awkward when you are trying to iron.

I have no idea how Anna managed to get hers ironed so perfectly. I have two theories: either it's a tiny iron or she's magical! I think if I had the right type of interfacing it would have been much easier, but I have no idea how she got her fabric ironed so nicely along the bottom!

Next time I would choose the heaviest interfacing available that is still sewable and iron it onto the outside fabric before I sew everything together. Then I would peel the paper off the second layer, insert the fabric and iron the lining in. That way, even if the bottom lining doesn't totally adhere to the fabric, it would still be sturdy.

In the tutorial, Anna makes her own binding. I opted to buy ready made double fold bias binding instead since things weren't working out for me.

Another important tip:
LOOK AT YOUR CHILD'S HANDLE BARS BEFORE YOU SEW ON THE VELCRO ATTACHMENT!!! I made mine for Y-shaped handle bars as per the tutorial, assuming that Daniel's Strider bike would be the same. Nope. He has a T-shaped bar.

So, between running out of bobbin thread, poorly remaking the handle attachment, fighting the urge to curse up a storm, and ironing and re-ironing-I finally got it finished. It's not perfect. But I love it...thanks for the great tutorial and the interfacing help, Anna!

Tuesday, August 24, 2010

Back to School and Making Beeswax Cloth

***UPDATE***
I now have an even better tutorial for making beeswax cloth here!


Daniel is starting preschool this Fall, and it seems like it's just around the corner. I am so excited for him, because I think he will love school. And sad for me because I love having him around all the time. I console myself thinking of running errands alone, uninterrupted crafting and occasional naps on those 2 afternoons.

Since he will be having snack at school, I decided to make matching snack bags and napkins for his Dick and Jane backpack. And I loved it so much that I decided to list the set on my Etsy store! The backpack is a great, free pattern from IndieTutes.


I've been looking into buying or making reusable snack bags for some time now, but it is hard to choose a material. I didn't want plastic or nylon touching his food. I mean, why not just use a Ziploc, then? And I didn't want the food to dry out either.

Then, I though that PUL might be safe since it's on his cloth diapers, but Hope at Little Moose Diapers told me that PUL is not food safe.  I found that a little alarming because there are TONS of PUL snack bags on Etsy, and other places.  So, my genius idea was to use beeswax cloth. But where do you find it? Well...I couldn't. But, there are tutorials for making it. From what I've heard it's a bit hit and miss. The basics are grating beeswax, spreading it over the cloth and melting it with wax paper and an iron. I head lots of problems with getting it even, and it soaking through and wrecking the look of the fabric. So I had to get creative about making the beeswax cloth and the reusable bags!

I ended up painting the beeswax onto the inside/liner fabric for the bags. I melted the wax over low heat on the stove and lightly brushed it onto the back side of the fabric. It worked great. I'm glad I did it only on the lining and not on the outside fabric for two reasons. First, the wax tends to bleed through on the edges and if it's on the inside it's not at all noticeable. Secondly, if I had done it on the outer fabric, I may not have made a liner and the liner makes it look way nicer, easier to wash and keeps the wax directly off your food. Not that it would be bad if it touches your food, but if it melted or whatever food got mushed in, it would make a mess. 

The upside to using beeswax: all natural, smells great, food safe, and keeps the food from dying out unlike plain cotton.
The downside: Hand washing in cold with mild detergent only. Worth it to me!

If you'd like a great snack bag tutorial, you can find one here.


I am excited to make a set. I have so many cute fabrics that are just waiting for a project! And don't forget to enter my giveaway!

Saturday, August 21, 2010

Tutorial: Craft Table Slipcover


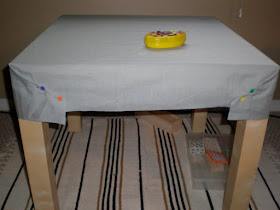
I just created an art station in the office for Daniel. Now, when Michael is doing school work, or I am sewing, he can be near us and out of trouble. A quick trip to Ikea, and less than $40 and we have an art nook for him! I bought him a Lack side table as his desk because it matches what we already have for  fraction of the cost ($10 vs. $40) of a "kids" table. I added a little throw rug so our carpet doesn't get covered in glue and paint and a Mammut stool. He already has a little easel, and when M has a moment I'm hoping he'll put together the desk lamp I bought. 

I was,  however, worried about the table getting trashed. It wasn't expensive, and I did buy it knowing it was a craft table, but I hate to ruin anything! So, I decided to make a slipcover/tablecloth for it. I knew that it would not stay on unless I sewed it slipcover style, and this is what I came up with. Keep in mind I did this in under 30 min, and it's not perfect. But, hey, how much time do you want to spend on something that is going to get constantly terrorized?

1) First, I measured the table, and added a few inches to each side for the overhang. My table measured about 22" inches square and I cut my fabric at 30" square. You could go longer, but make sure to leave room for little knees! I laid the fabric over the table to check the size.


2) Then, I folded the corners in, wrapping paper style and pinned them in place. I pinned just like it was a boxed gift, leaving two edges smooth, with no folds and two with folds pointing in to eachother.


3) Next I trimmed the overhang so it was pretty even all around. Obviously I am not the best at measuring and cutting fabric!

4) Time to head to the sewing machine. I didn't bother pinning, because I wasn't worried about it being perfect. If your slipcover is going on not-a-craft-table, pin it!  I hemmed all the way around lining up the edge of my fabric with the foot and folding under as I went. Try not to catch any folds that shouldn't be there as you sew the corners.
If you want a more finished look, you can do a double turned hem, ironing and pinning to make sure it comes out just right.

5) I wanted Daniel's desk to really be his own, so I asked him to look through my fabric stash with me and choose one he liked. He's got good taste, and chose Michael Miller's Retro Rockets. I cut out a little scene that I liked, and a background fabric to stitch it onto. I folded under the edge of the rocket fabric and pinned the first side onto the black fabric. Then I started sewing, and just folded as I went. Again, if you want it to be really sharp, iron, double turn, pin.


5) Next, I pinned the background fabric onto the slipcover and folded and pinned one edge, started sewing and continued folding as I went. I trimmed my poorly done corners (that's what you get for not pinning) when I was finished.


And, voila! No mama bear growling at cub to keep the crayons on the paper. Ahh...peace in the sewing room!


Oh...and don't forget to enter my Giveaway!

Thursday, August 19, 2010

GIVEAWAY!!!


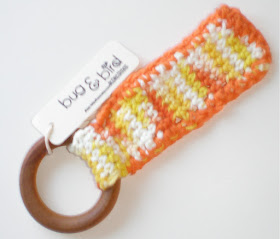
I am so excited for my first giveaway! From now til September 1st you have the chance to win a beautiful wooden teething ring, with a beeswax finish and cotton crochet panel.

Here's how to enter:

-Check out my new Esty store
-Leave me a comment (with a link to your blog) and tell me what item you liked best in my store when you're done!

-For an extra entry blog about the giveaway, or if you don't have a blog, tweet or link to me in a facebook post and leave me the specific URL in your comment.

I will do a random drawing in the first week of September!

Thursday, August 12, 2010

Thrift store finds!


So many treasures! I've been scoping out thirft stores for a month now, trying to find some fun things for a vintage swap I am doing. I hit the jackpot at the MCC thrift store today! I have been looking for something enamel with a lid to use as an outdoor washbasin and almost spent $20 on one I found online. Today I found one for $3! Perfect for rinsing hands off after a play in the sandbox.

And some awesome vintage linens that are just crying out to be transformed into something cool. And those square baskets? 10 cents!!!!! I am so happy!

Tuesday, August 10, 2010

Homemade Sling: Stretchy Wrap

I think every new mom should have a good sling, which is why I made one for my friend Cara and her partner, Nathan to use with their new little one, Brenna.

Photo Courtesy of Nathan Hall

It was almost so easy! I read some tutorials here on Make Baby Stuff and a few other tips and tut's here and there. It sounded like 4m of a good quality jersey was enough. So that's what I bought. But actually I needed 5m. So, the troubleshooting started and, with the help of a talented friend, I decided to put a 1m panel in the center. I found a beautiful (and ridiculously expensive) batik print on clearance and snagged it up.

At this point I actually got excited about my mistake because it meant I could use a more expensive print on future slings and not break the bank! The batik was considerably less stretchy and didn't have a lot of give. I was a bit worried, but it is actually more supportive for babe while still allowing you to pull it over baby's body without much work.


My sewer friend, Darcie, showed me how to sew the panel on so it would be secure (a French seam, Darcie?). And when I was sure that is would hold, I top stitched just to make sure! It took a loooong time to hem 5m of fabric. I didn't pin, just rolled it under in sections as I went. The batik was very fussy and I don't know if I would use it again. Next time I may try and taper the ends at a gentle angle for the last half meter or so on each end. It makes tying easier, but I wasn't brave enough to try it my first time.

I'm so happy it turned out and that Nathan and Cara are using it!


This is me trying Daniel in the sling to make sure it would hold up to a toddlers weight. He looks so tall!

Saturday, August 7, 2010

Birthday Madness: Part Two


Daniel helped me make his cupcakes this year. He loved following the steps of the recipe, and helping me with the blender. Thanks to my mother in law's piping bag, I didn't have to use parchment triangles this year! It is SO much easier with a piping bag. The cupcakes are chocolate with peanut butter, and raspberry icing.  Here are the recipes:


3/4 cup soft butter
4 1/2 cups icing sugar
3 tsp milk or water (I use water)
2 tsp vanilla

Beat butter until soft, add icing sugar slowly. Beat in liquid 1 tsp at a time. Split in half.

Add 3 tbsp peanut butter to one half and mix well. You may need to thin out with a little water.

Add 2 tbsp rasperry jam/jelly to the other half and beat. You may need to thicken up with more icing sugar.

The best part of it all, for my numbers-obsessed little guy was finding these (free and printable!) cupcake flags at Fog and Thistle.

Wednesday, August 4, 2010

Birthday Madness: Part One


This weekend was Daniel's third birthday! I can't believe he's not a toddler anymore! Instead of wrapping his gifts, I decided to clear out the play area, and reorganize with all his new things. He loved the matching game and stopped to play right away.


My other big project for him was dying play silks. I spent a lot of time on several different methods before I found one that I liked.


I also gave him some wooden balls and acorns with scoops and tongs to give him some fine motor  practice. He started making "noodles" right away.


Once we got to the lake for his party, we gave him his big gift: a beanbag board and mini beanbags. The kids had a lot of fun playing. The older kids were trying for big points and the little ones were excited even when they hit the board. I think D liked that the beanbags were so small and light.

I'm really happy with how everything turned out, and that for once, he likes what I made him! Yay!